
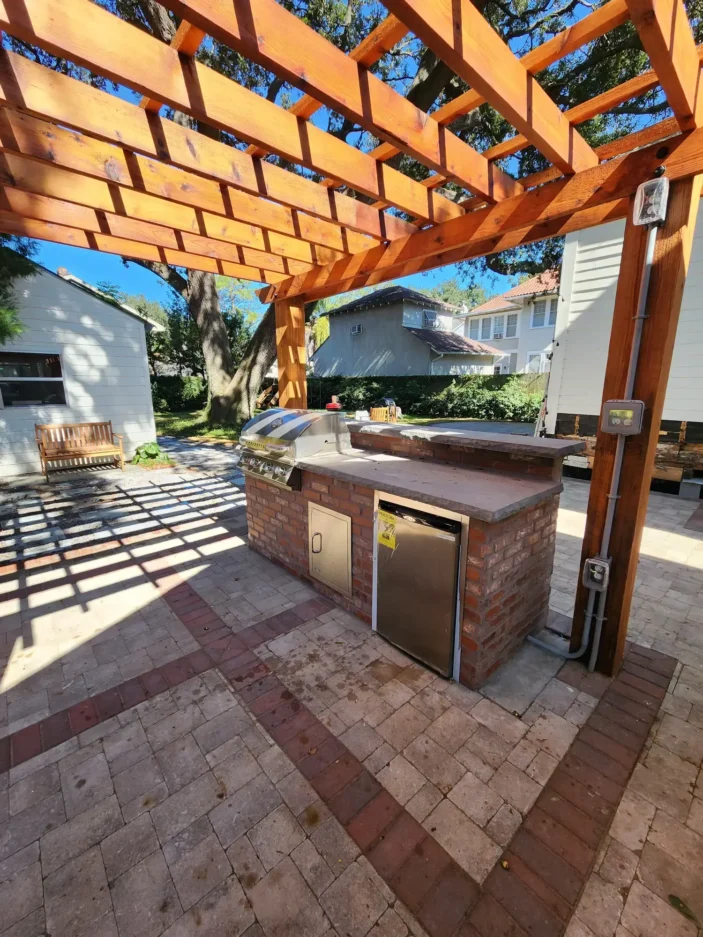
An outdoor kitchen is one of the most rewarding investments you can make in a 30A property. The ability to cook, entertain, and dine outside year-round is genuinely one of the best parts of living along Florida’s Gulf Coast. But most of the planning attention goes to appliances, countertops, and cabinetry. The flooring underneath? It tends to be an afterthought.
That’s a mistake worth avoiding. The paver flooring beneath an outdoor kitchen does more than look good. It has to handle cooking grease, heavy appliance loads, intense heat radiating from grills and smokers, constant foot traffic, and Florida’s rain, humidity, and salt air, all at the same time. Getting the flooring right from the start protects everything built on top of it and saves you from expensive corrections later.
This guide covers everything that goes into designing outdoor kitchen paver flooring specifically for 30A conditions, from layout and load planning to material selection, drainage, and finishing details. If you’d like a local specialist to assess your specific site before you commit to a design, reaching out to a trusted paving company 30A homeowners rely on is a smart first step.
Start With the Layout, Not the Material
The most common planning mistake homeowners make with outdoor kitchens is choosing materials before they’ve figured out the layout. Material decisions should follow layout decisions, not precede them.
Before you select a single paver, work through these questions:
How large will the kitchen footprint be?
Outdoor kitchens range from a compact grill station with a small prep area to full-scale cooking environments with multiple appliances, refrigeration, bar seating, and dining space adjacent. The footprint determines how much paver surface you’re working with and whether that surface needs to accommodate different functional zones.
What appliances are going in?
A built-in grill, smoker, pizza oven, side burners, refrigerator, and sink each add weight and create specific flooring demands. Heavy appliances need a stable, well-compacted base beneath the paver surface, or you’ll see settling and cracking over time.
Where will people stand and move?
The cooking zone, the prep zone, and the serving zone each see different traffic patterns. The area directly in front of the grill sees the most concentrated foot traffic and the most grease and heat exposure. That’s the zone where flooring material and finish matter most.
How does the kitchen connect to adjacent spaces?
Most outdoor kitchens sit adjacent to a patio, pool deck, or dining area. Planning the paver flooring as part of a connected surface, rather than an isolated platform, creates a cohesive result that reads as professionally designed. If you’re also planning a patio paver area nearby, using the same or complementary materials across both surfaces ties the whole outdoor space together visually.
The Flooring Challenges Specific to Outdoor Kitchens
An outdoor kitchen puts demands on paver flooring that a standard patio or walkway doesn’t. Understanding those demands shapes every material and design decision that follows.
Grease and cooking oils: Grease splatter from grills and fryers is inevitable. On an unsealed or improperly sealed surface, cooking oils penetrate paver pores and create permanent staining. The right sealer applied to the right material is what separates a surface that cleans up easily from one that looks permanently stained after the first few cookouts.
Heat exposure: The area directly beneath and around a grill gets hot. Not just warm: genuinely hot, especially if the grill sits close to the surface or if a smoker runs for extended periods. Some paver materials and sealers handle sustained heat better than others.
Heavy structural loads: A built-in grill with a stone or concrete surround, a refrigerator, and granite countertops can easily exceed 1,000 pounds in a single section. The paver base beneath heavy kitchen structures needs to be engineered for that load, which typically means a deeper, more heavily compacted gravel base than a standard patio installation.
Drainage: Outdoor kitchens generate water from sinks, ice bins, drink stations, and rain. Without proper drainage, water pools under and around appliance bases, accelerating corrosion and creating slip hazards. The paver floor needs a deliberate slope and drainage plan, not just a general gradient toward the lawn.
Salt air and coastal exposure: Everything along 30A deals with salt air, but an outdoor kitchen compounds that exposure with cooking fumes, grease, and moisture. Materials that hold up well to this combination are fewer than most homeowners expect.
Choosing the Right Paver Material for Outdoor Kitchen Flooring
Not every paver material handles the specific demands of a cooking environment equally well. Here’s how the most common options along 30A compare.
Porcelain Pavers
Porcelain is the strongest performer for outdoor kitchen flooring, full stop. It’s non-porous, which means grease, oils, and cooking stains don’t penetrate the surface. It’s extremely resistant to heat, staining, UV fading, and chemical exposure. It cleans up with a simple wash and requires no sealing.
The trade-off is cost. Porcelain pavers are among the more expensive options, and they require skilled installation because they’re denser and harder to cut than concrete or natural stone. But for the specific demands of a cooking environment, no other material matches their practical performance.
Porcelain is available in large-format sizes that suit contemporary outdoor kitchen designs, and in finishes that closely replicate the appearance of natural stone, wood, or concrete. For homeowners who want a premium, low-maintenance kitchen floor that genuinely holds up, porcelain is the most defensible choice.
Travertine
Travertine is the most popular choice for luxury outdoor spaces along 30A, and it performs well in most kitchen applications with one important condition: it must be properly sealed before use and resealed on a regular schedule.
Travertine’s natural porosity makes it vulnerable to grease penetration without a quality penetrating sealer in place. With the right sealer maintained consistently, it handles cooking environments well and looks genuinely beautiful doing it. Its natural texture provides good traction, and its heat-reflective properties keep the surface comfortable underfoot even in Florida’s peak summer heat.
For outdoor kitchens where aesthetics matter as much as performance, sealed travertine is a strong choice. Just be honest with yourself about the maintenance commitment. Sealing intervals near a cooking zone should be shorter than elsewhere on the property, typically every one to two years.
Concrete Pavers
Concrete pavers are the most common choice for outdoor kitchens on 30A, largely because they’re durable, affordable, and available in an enormous range of sizes, colors, and finishes. They handle heavy loads well, resist cracking, and accept sealers readily.
For cooking zones specifically, choose a concrete paver with a textured or brushed finish rather than a smooth one. Smooth concrete becomes slippery when wet or greasy, which is a genuine safety concern in a kitchen environment. A textured finish maintains traction even with cooking spills on the surface.
Concrete pavers also benefit from a quality film-forming or penetrating sealer in kitchen applications, applied before the kitchen goes into regular use and reapplied every two to three years.
Natural Limestone
Limestone sits between travertine and concrete in both price and performance. It’s durable, attractive, and relatively heat-tolerant, but its porosity requires the same diligent sealing approach as travertine. It’s a reasonable choice for kitchen flooring where a natural stone appearance is the goal and the sealing schedule will be maintained.
Avoid lighter-colored limestone in high-grease zones, as staining is harder to prevent and harder to remove on pale natural stone even with sealing.
What to Avoid
A few materials that are popular elsewhere on the property are less suitable for outdoor kitchen flooring:
Smooth-finish natural stone without texture treatment. Polished marble or honed limestone without a grip-enhancing finish is genuinely slippery when wet or greasy. It’s a safety liability in a cooking environment.
Very light-colored pavers in cooking zones. Cream and ivory tones look beautiful on patios and pool decks but show grease staining more readily near cooking appliances. If light colors are important for design continuity, use them in the dining and lounging zones and choose a slightly deeper tone in the cooking zone itself.
Material Comparison at a Glance
| Material | Grease Resistance | Heat Tolerance | Traction | Maintenance | Cost |
| Porcelain | Excellent | Excellent | Very good | Very low | Higher |
| Travertine (sealed) | Good | Very good | Good | Moderate | Higher |
| Concrete pavers | Good (sealed) | Good | Good (textured) | Low to moderate | Standard |
| Limestone (sealed) | Good | Good | Good | Moderate | Moderate |
Layout and Zoning: Designing the Floor Plan
A well-designed outdoor kitchen floor plan separates the space into functional zones, each with slightly different flooring considerations.
The cooking zone is the area directly in front of and around grills, smokers, and burners. This zone sees the most heat, grease, and foot traffic. Prioritize traction, easy cleaning, and grease resistance here. If you’re using different materials or finishes across zones, the cooking zone should get the most durable, easiest-to-clean option.
The prep and counter zone sees constant standing traffic but less direct heat and grease exposure. Material requirements are similar to the cooking zone but slightly more relaxed.
The serving and bar zone is where guests congregate, and drinks get poured. Traction still matters here since spills are common, but grease exposure is minimal. This zone is where you have the most design flexibility.
The dining zone is the most relaxed in terms of flooring demands. It’s essentially a patio surface adjacent to the kitchen. Using the same paver material here as elsewhere on the patio creates a seamless transition, while a slightly different pattern or border can still define the dining area as its own visual zone.
Drainage Planning for Outdoor Kitchen Floors
Drainage is non-negotiable for outdoor kitchen paver floors, and it needs to be planned before the first paver goes down, not after.
The paver surface beneath an outdoor kitchen should slope away from the kitchen structure at a minimum of 1 percent grade, ideally 1.5 to 2 percent. That slope directs water from rain, sink runoff, and spills away from appliance bases and toward the edge of the paved area or a designated drain point.
For kitchens with a sink, an ice bin, or a beverage station, a linear drain or area drain integrated into the paver floor is worth the added cost. A surface that drains quickly and completely is easier to clean, safer underfoot, and far less likely to develop the persistent moisture problems that accelerate corrosion on outdoor appliances and cabinetry.
If your outdoor kitchen connects to a pool deck area, coordinate the drainage plans for both surfaces from the start. Two adjacent surfaces draining in conflicting directions create pooling problems that are difficult and expensive to correct after installation.
Design Details That Make the Difference
A few finishing details separate outdoor kitchen floors that look professionally designed from those that look assembled.
Border definition: A single row of contrasting pavers around the perimeter of the kitchen floor defines the space clearly and gives it a finished, intentional appearance. Even a subtle color variation makes the kitchen floor read as a distinct zone within the larger outdoor space.
Pattern continuity: If the kitchen floor connects to an adjacent patio, carrying the same pattern through both surfaces creates visual flow. Alternatively, using a perpendicular version of the same pattern at the transition point creates a natural visual break without introducing a second material.
Matching steps and transitions: If the outdoor kitchen sits at a different level than the adjacent patio or yard, outdoor steps and stair pavers in the same material as the kitchen floor create a seamless transition. Mismatched steps are one of the most common signs of a space that wasn’t planned as a whole.
Under-appliance clearance: Make sure the paver surface beneath built-in appliances is level and fully supported. Gaps or voids beneath grill bases and refrigerator platforms allow moisture to accumulate and create corrosion problems over time. A solid, well-compacted surface right to the edge of each appliance is the right approach.
Lighting integration: Low-voltage LED step lights or in-ground fixtures along the kitchen floor perimeter make the space genuinely usable after dark and add a polished visual quality that’s difficult to achieve any other way. Run conduit during installation, not after.
How Paver Flooring Connects to the Broader Outdoor Space
The most successful outdoor kitchen designs along 30A don’t treat the kitchen floor as an isolated surface. They plan it as part of a cohesive outdoor environment where materials, patterns, and levels flow logically from one area to the next.
If you’re installing an outdoor kitchen as part of a larger hardscaping project that includes a patio, pool deck, retaining walls, or driveway, the flooring decisions for each surface should be made together. Using the same primary material across multiple surfaces, with pattern or color variations to define individual zones, creates a property-wide design cohesion that significantly increases both visual appeal and resale value.
For properties with grade changes near the kitchen area, retaining wall pavers in a complementary material can create level platforms for the kitchen structure while managing slope and soil stability at the same time.
Frequently Asked Questions
What is the best paver for an outdoor kitchen floor in Florida?
Porcelain pavers are the top performer for cooking environments because they’re non-porous, grease-resistant, heat-tolerant, and require no sealing. For homeowners who prefer natural stone aesthetics, properly sealed travertine is the next best option. Concrete pavers with a textured finish are the most common and cost-effective choice.
Do I need a special base under outdoor kitchen paver flooring?
Yes. Built-in outdoor kitchens are significantly heavier than patio furniture or normal foot traffic. The gravel base beneath kitchen structures should be deeper and more heavily compacted than a standard patio installation. Your installer should account for appliance and structure weight during base engineering.
How do I keep grease from staining my outdoor kitchen pavers?
The most effective approach is a quality penetrating or film-forming sealer applied before the kitchen goes into use, maintained on a regular resealing schedule. Clean up cooking spills promptly rather than letting them sit. For concrete pavers, a sealer with a stain-guard additive provides additional protection in high-grease zones.
Can I use the same pavers for my outdoor kitchen and adjacent patio?
Yes, and it’s actually the preferred approach from a design standpoint. Using the same material across both surfaces creates visual continuity and makes the transition between cooking and dining zones feel seamless. You can differentiate the zones with pattern, border treatment, or a slight level change rather than a material switch.
Do outdoor kitchen paver floors need drainage?
Absolutely. The paver surface should slope away from the kitchen structure at 1 to 2 percent grade. For kitchens with a sink, ice bin, or heavy rain exposure, integrating a linear or area drain into the floor plan is strongly recommended.
How often should outdoor kitchen pavers be sealed in 30A’s coastal environment?
In the cooking zone, plan on resealing every one to two years given the combined exposure to cooking grease, salt air, humidity, and UV. Adjacent dining and lounge zones follow a standard schedule of every two to three years depending on material.
Ready to Plan Your Outdoor Kitchen?
Getting the paver flooring right sets the foundation for everything else in your outdoor kitchen design. If you’d like a local expert to assess your site, walk through material options, and help you plan a floor that handles everything a coastal Florida cooking environment throws at it, the team at 30A Delta Pavers is ready to help. Reach out to speak with a specialist and get your project started on the right foot.